How to provide liquidity to Beefy Vaults on Fantom

In this guide we will explain how to provide liquidity to Beefy Vaults on Fantom to earn yield farming rewards.
What is Fantom?
Fantom is a high-performance, scalable, and secure smart-contract platform. It is designed to overcome the limitations of previous generation blockchain platforms. Fantom is permissionless, decentralized, and open-source. It uses a novel aBFT consensus mechanism called Lachesis which allows Fantom to be much faster and cheaper than older technologies, yet extremely secure.
What is Beefy Finance?
Beefy Finance is a Decentralized, Multi-Chain Yield Optimizer platform that allows its users to earn compound interest on their crypto holdings. Through a set of investment strategies secured and enforced by smart contracts, Beefy Finance automatically maximizes the user rewards from various liquidity pools (LPs), automated market making (AMM) projects, and other yield farming opportunities in the DeFi ecosystem.
The main product offered by Beefy Finance are the ‘Vaults’ in which you stake your crypto tokens. The investment strategy tied to the specific vault will automatically increase your deposited token amount by compounding arbitrary yield farm reward tokens back into your initially deposited asset. Funds are never locked in any vault on Beefy Finance: you can always withdraw at any moment in time.
What you will need to provide liquidity on Beefy on Fantom
- Metamask wallet
- FTM tokens in your Fantom wallet for gas
- Supported tokens to provide as liquidity on Solidly
Setting up the Fantom network with your Metamask wallet
Much like with the Polygon network, you can use Metamask to interact with Fantom. There is a web wallet you can use to monitor your balances. It was created as a Progressive Web App (PWA) to make it easier to launch on all major platforms.
To configure your MetaMask to have the ability to access the Fantom network you need to click the icon in the top right corner and select “Settings”. Once there, find the tab labelled “Networks” and when you arrive there you should see a button to “Add Network” where you can input the settings below:

Here is the list of the parameters so you can easily copy them:
- Network Name: Fantom Opera
- New RPC URL: https://rpc.ftm.tools/
- Chain ID: 250
- Currency symbol: FTM
- Block explorer URL: https://ftmscan.com
This process adds the Fantom network to the list of available networks you can switch to from within Metamask. Sometimes it is helpful to switch networks when Metamask is acting strange or if you are having trouble getting things to show up.
Move funds from ETH or Polygon/Matic networks to the Fantom chain
Key takeaway: Moving stablecoins to Fantom is cheap and easy, moving FTM is a bit more difficult. You can get a small amount of FTM if you have none from an FTM faucet.
A website called Fantom Community Alerts has set up a faucet to distribute FTM tokens to new users of the platform so they have enough FTM to make their first trade. You can find it in the section of their page with the label “FTM Faucet”. This is helpful if you are only using the stablecoin bridge mentioned below and have no FTM in your wallet to make the first transaction.
To move funds from ETH mainnet to the Fantom network, you must first own some FTM tokens on Ethereum, you can purchase them on Uniswap or Sushiswap. You can then use a service called Multichain.xyz to swap the FTM to the Fantom chain by selecting FTM (ETH) and FTM (Fantom) in the interface and performing the swap. Be aware that this method has Minimum and maximum amounts for swap sizes and fees. The minimum fee is 80 FTM so be sure that you are swapping enough tokens to make it worth the 80 FTM.
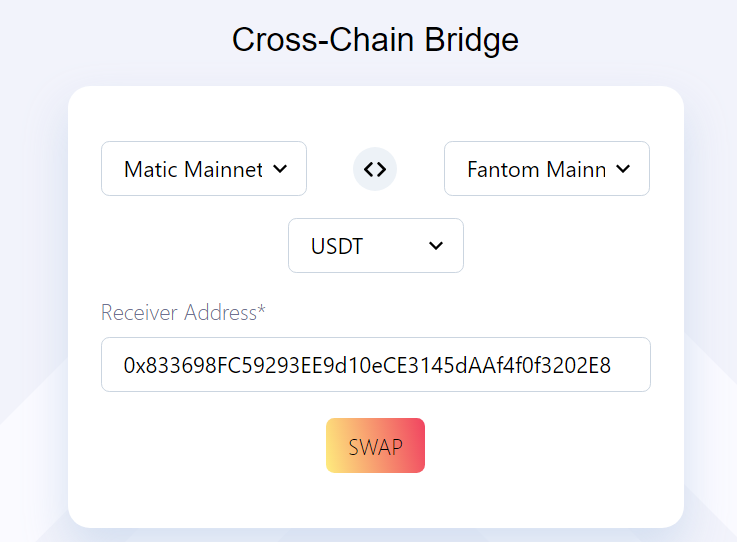
Using a service called xPollinate (which is powered by Connext and 1Hive) you can easily move stablecoins like DAI, USDT and USDC from the Matic chain to the Fantom chain. They currently support moving stablecoin funds back and forth between xDAI, Polygon, Fantom and Binance Smart Chain. This service is dependent on the availability of exit liquidity for each of the chains, which they display below the main swap interface. At the time of writing, there was plenty of exit liquidity for most of the chains except Polygon/Matic.
Finding the right Vault to provide liquidity to on Beefy
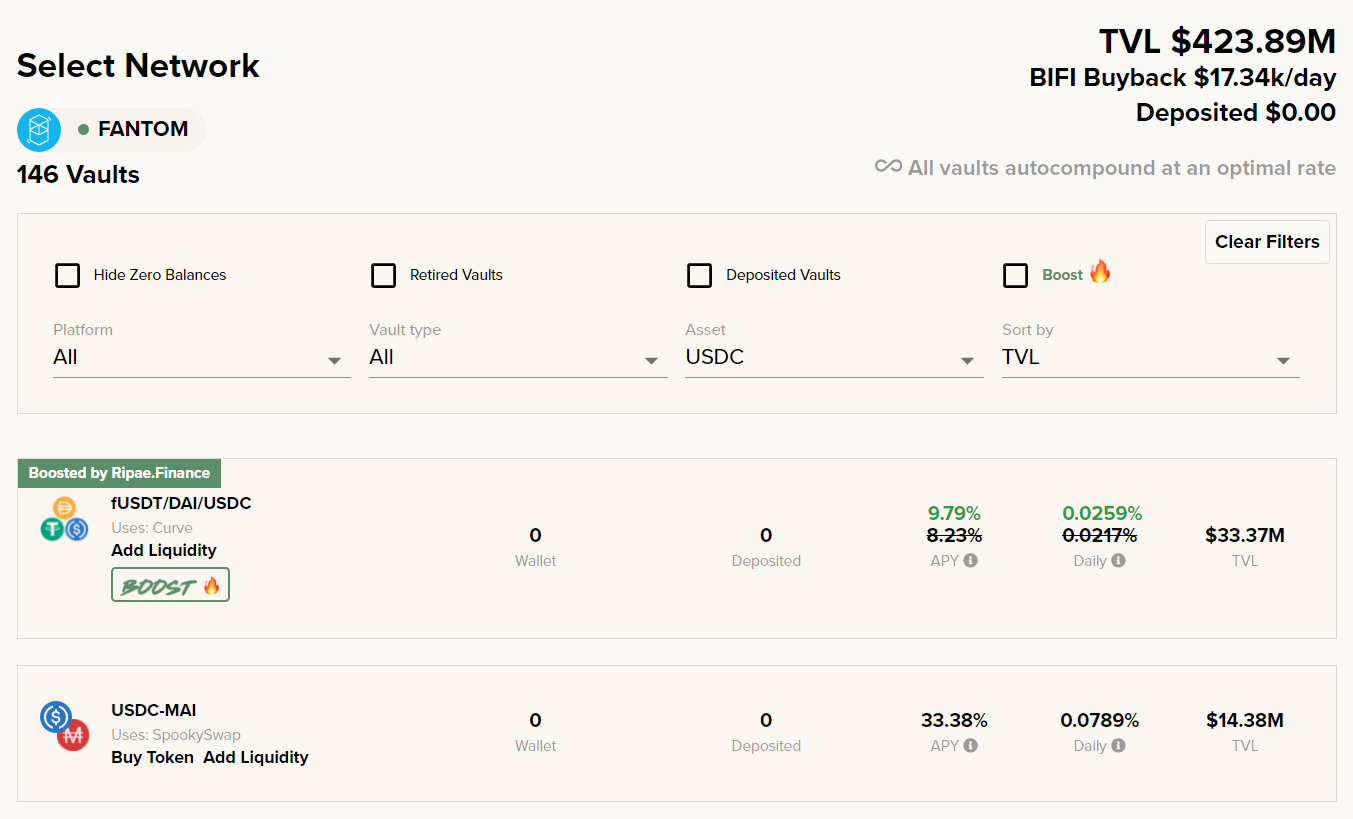
Beefy has a variety of options on their platform ranging from vaults that require LP tokens from an AMM to deposit to single asset vaults that only require depositing one type of token. You can use the filters at the top of the page to narrow your selection by a few different criteria like which AMM platform the LP tokens are from or which types of assets you are looking to stake. You can also sort by vault APY or TVL to get a sense of what is popular or performing well currently.
Platforms: Beefy, Beethoven X, Curve, Ester, Froyo, Geist, JetSwap, MIM, Ripae, Scream, Spartacadabra, SpiritSwap, SpookySwap, SushiSwap, Tomb, WigoSwap
Vault types: Single Asset, Stable LP’s, Stables
Steps to add liquidity to Beefy vaults
Step 1: Identify which vault you would like to deposit to and make sure you have either the single token or LP tokens needed to deposit. For more info on how to add liquidity to AMM’s to get the LP tokens, you can check out this article that offers a guide on supplying liquidity to QuickSwap. For this example we have chosen the MAI-USDC LP vault.
If you do not have the LP token, you can use the “Buy Token” link shown above to swap into the tokens needed for this vault. Once you have the 50/50 proportion of both tokens you can then use the “Add Liquidity” link (highlighted above) to deposit the tokens into the AMM (SpookySwap in this example) liquidity pool to get the LP tokens needed. The process for adding liquidity can vary from protocol to protocol, check our blog archives for guides on how to use many of them.
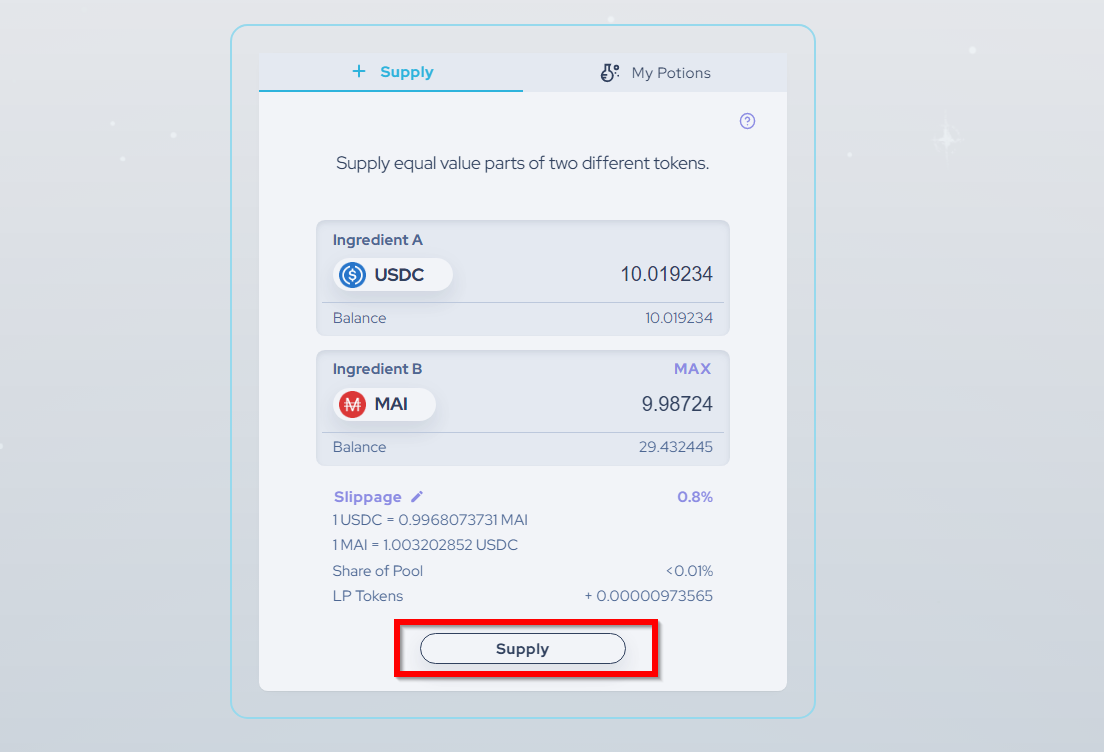
Step 2: For this vault, you will first need to go to SpookySwap and add liquidity to the MAI-USDC pair to get the LP tokens you need for this vault. You do NOT need to stake those LP tokens on SpookySwap as Beefy will be doing that for you.
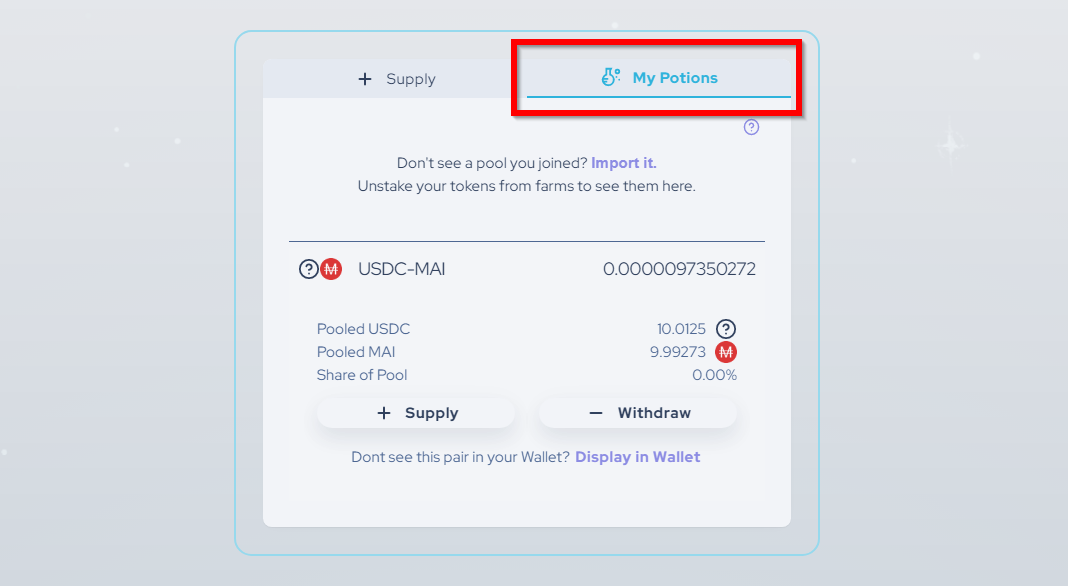
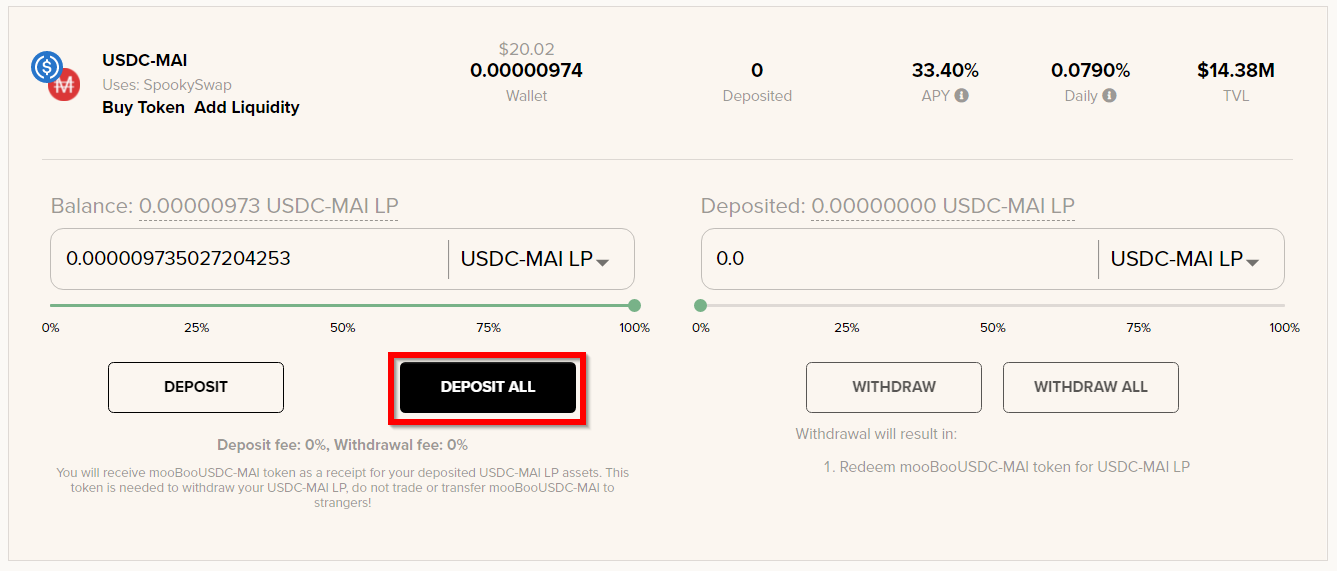
Step 3: Click the “Approve” button and confirm the transaction then you will get an option to “Deposit” as pictured below. I usually use the “Deposit All” button to make sure there is no dust left in the wallet after. Hit either button and you will start auto-compounding! You will notice each vault comes with a set of fees, this particular vault charges 0.5% to deposit so be sure to factor that into your decision.
Once the deposit goes through you will see the balance reflected on the “Withdraw” side of the UI.
Track Your Position With APY.vision
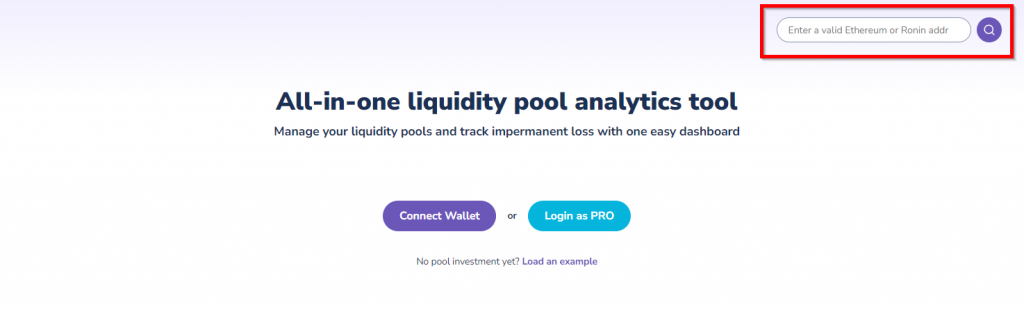
First time APY.vision users – enter your Fantom address in the box highlighted above. On mobile/tablets click on the search icon and copy their address into the popup
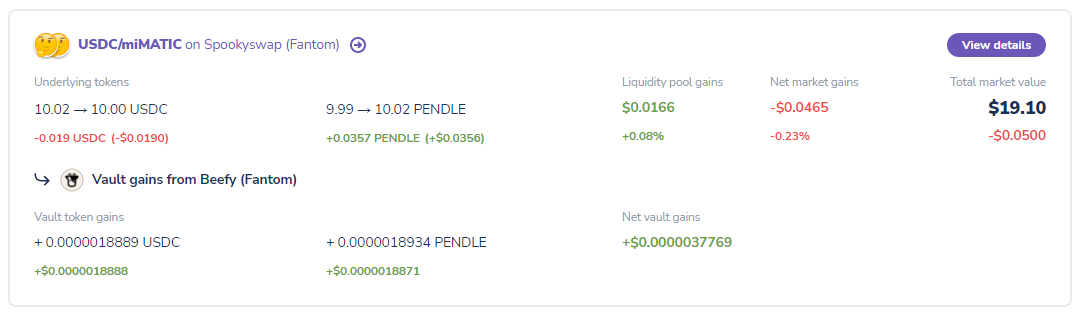
Once your liquidity position is deposited on Solidly, you can start tracking the performance of the vault. You can see in the picture below that APY.vision will track the shift in the token balances in the pool. For more details on a given position you can click the “View Details” button to get even more analytics and information about your position.
How to withdraw and what to expect
One important thing to note is that different vaults have different fees associated with deposits and withdrawals. The vault we are using has no withdrawal fees, but there are some that do.
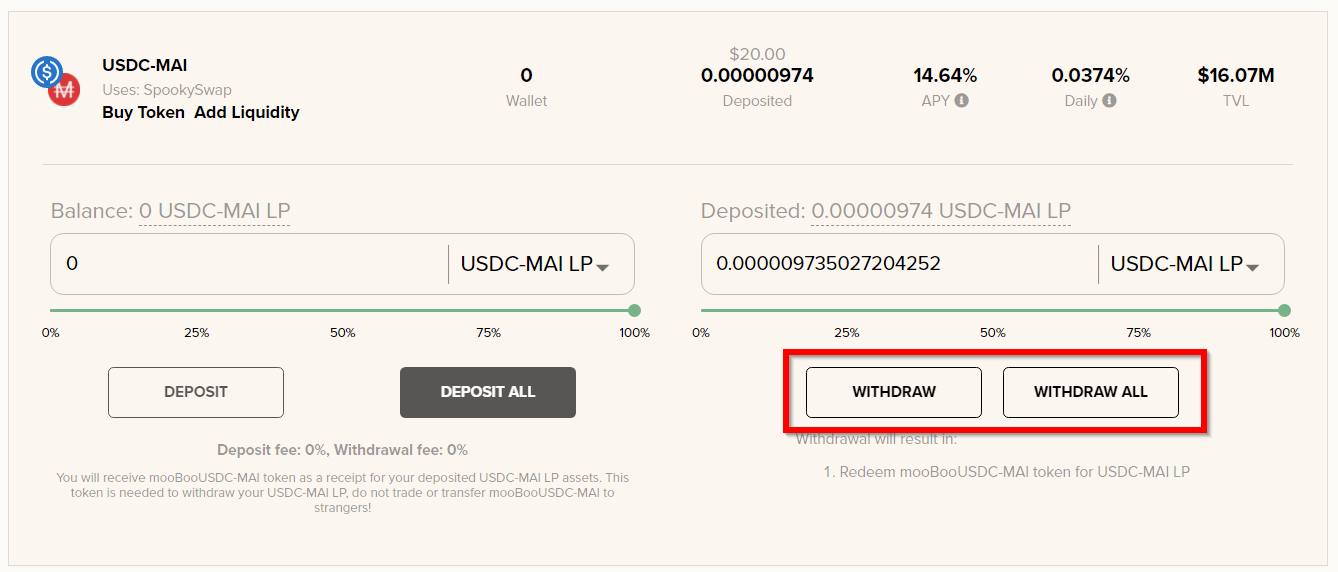
When you are ready to pull your liquidity from the vault, simply hit one of the “withdraw” or “withdraw all” buttons and your LP tokens will be back in your wallet. To exit the liquidity pool entirely, you will have to go back to the AMM where you entered into the pool to get your tokens back. Note you only need to do this if you are in a vault using LP tokens, a single asset vault will not require these extra steps.
Conclusion
Providing liquidity is a great way to earn some income on tokens sitting in your wallet. You do have to be careful when providing liquidity, as sharp price increases or decreases can have a huge impact on the performance of your position. To read more about the risks, we highly recommend reading this post. We suggest using APY.Vision to keep a close eye on your positions to know when to remove liquidity during times of extreme price volatility.
APY.Vision does not give investment advice and always insists that you do your own research. Read our full Legal Disclaimer.
Check out APY.Vision!
APY.Vision is an advanced analytics tool for liquidity pool providers and yield farmers. If you’re using any DEXs, AMMs, or liquidity pools this is the tool you will need to easily track the ROI of your liquidity provider and yield farming activities. Try it now!