How to provide liquidity to Uniswap V3 on Optimism
In this guide we will explain how to provide liquidity to Uniswap V3 pools on the Optimism network to earn swap fees from trading on the Uniswap platform.
What is Optimism?
Optimistic Ethereum is a rollup scaling solution that allows users to make transactions on the Ethereum network and get them executed faster for a much lower gas cost. This is known as a Layer 2, where users typically have the same addresses as they do on the Ethereum blockchain which is referred to as Layer 1. There are gateways that allow messages and assets to be transferred between the layers.
According to Messari and Uniswap in the tweet below, L2’s like Optimism are making major moves!
What is Uniswap V3?
Uniswap v1 was launched in November 2018 as a proof of concept for automated market makers (AMMs), a type of exchange where anyone can pool assets into shared market making strategies. In May 2020, Uniswap v2 introduced new features and optimizations, setting the stage for exponential growth in AMM adoption. Uniswap now serves as critical infrastructure for decentralized finance, empowering developers, traders, and liquidity providers to participate in a secure and robust financial marketplace.
Recently an upgrade was released (Uniswap v3) that introduces new features. One feature is concentrated liquidity that gives individual LPs granular control over what price ranges their capital is allocated to. Another innovation is multiple fee tiers that allow LPs to be appropriately compensated for taking on varying degrees of risk and to reduce trading fees for pools with high volumes.
What you will need to provide liquidity on Uniswap V3 on Optimism
- Metamask wallet
- ETH tokens in your Optimism wallet for gas
- Tokens to deposit into the your Uniswap v3 NFT position (or tokens you can use to swap into the tokens needed for a given pool)
Setting up the Optimism network with your Metamask wallet
First, you will need to configure your Metamask wallet to connect to the Optimism network. You will need to open Metamask and click on the Network selection dropdown and then click on Custom RPC.
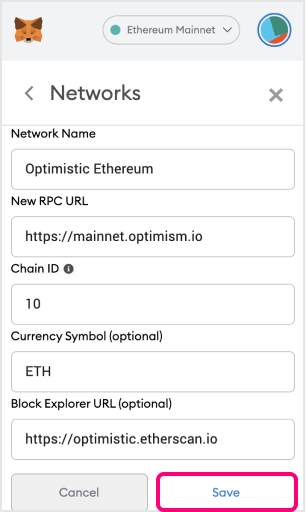
Fill out the empty fields as shown in the picture above and click on Save. You will be directly switched to Optimism’s Mainnet now in the network dropdown list. This process adds the Optimism network to the list of available networks you can switch to from within Metamask. Sometimes it is helpful to switch networks when Metamask is acting strange or if you are having trouble getting things to show up.
Here is the list of the parameters so you can easily copy them:
- Network Name: Optimistic Ethereum
- New RPC URL: https://mainnet.optimism.io
- Chain ID: 10
- Currency symbol: ETH
- Block explorer URL: https://optimistic.etherscan.io
After you have set up Metamask to connect to Optimistic Ethereum, you can then connect to the Uniswap app. Select “Optimistic Ethereum” from the list of networks in the top right and then you can begin interacting with Uniswap.
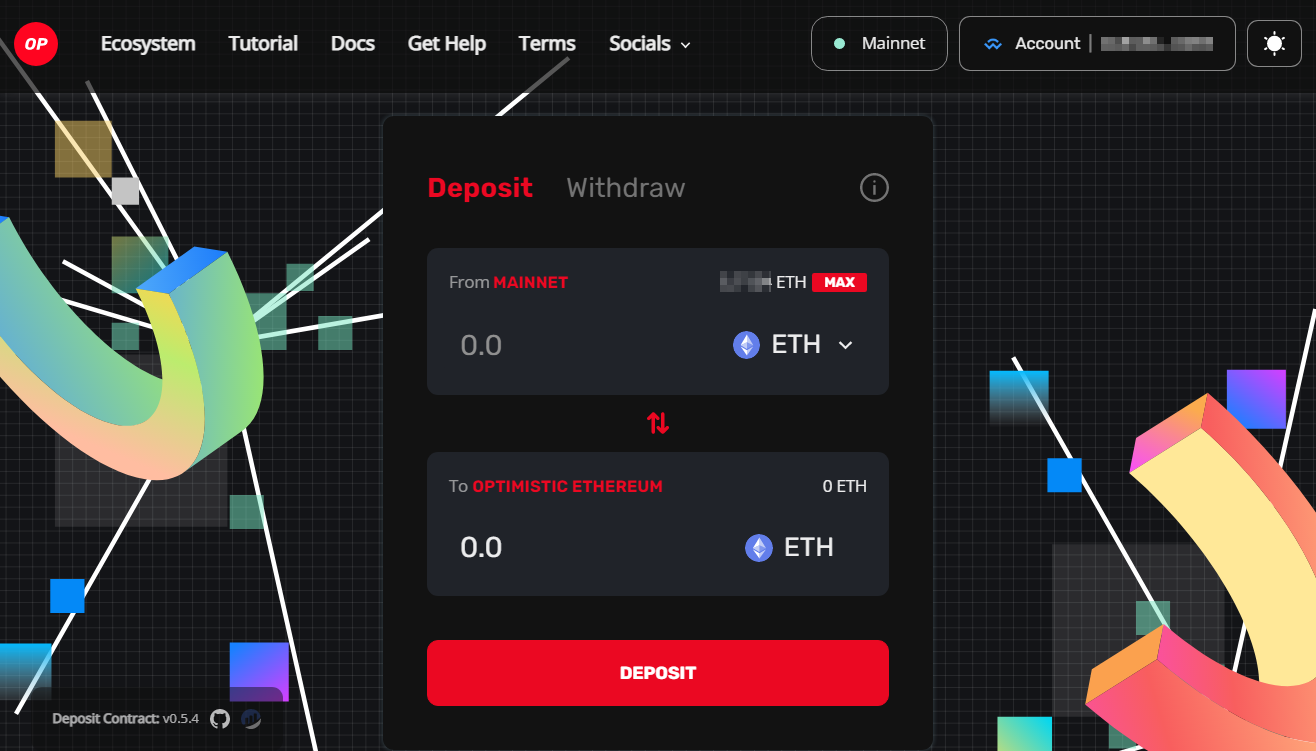
Move funds from ETH network to Optimism network
The safest way to move funds over to Optimism is directly from the Ethereum network using the Optimism Gateway pictured below.
- One very important thing to note is that withdrawals from Optimism can take 1 week!
- APY.vision has a new Bridge tool that can help you find paths between many different chains
Finding the right pool to provide liquidity to on Uniswap V3 on Optimism
Uniswap V3 on Optimism has an assortment of pools that have already been created, although there are options to create your own pools if you do not see one with your tokens. Creating your own pools is more advanced and not recommended for your first pool. You can sort the list by TVL, 24 Hour Volume or 7 Day Volume in order to find a pool that suits your needs. Pools with low TVL and high volume will typically generate the most fees for LP’s. Be sure to note the fee size of the pool listed next to the token pair as the fees charged can be different for each pool.
Steps to add liquidity to Uniswap V3 pools
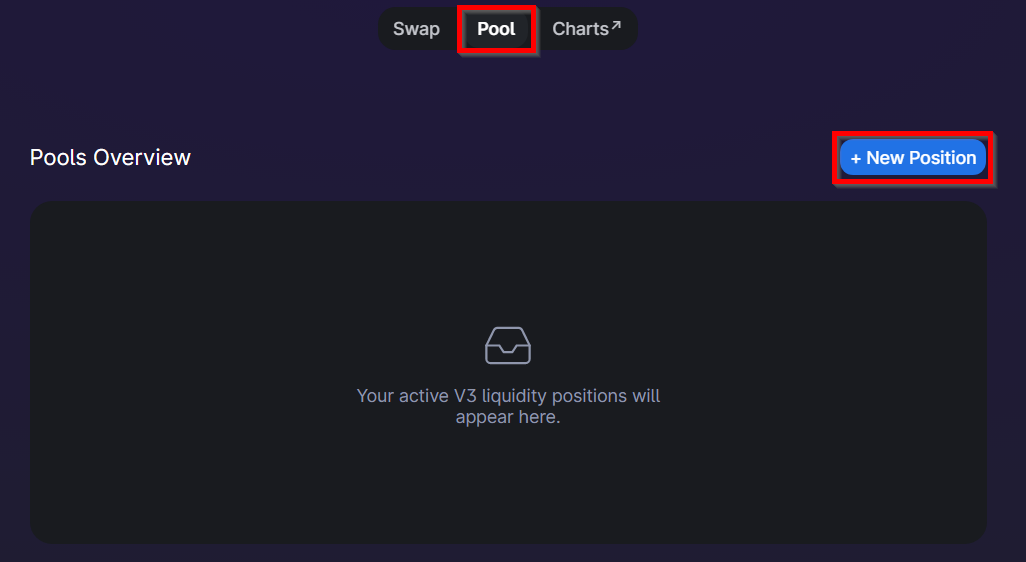
After your wallet has been connected, in order to add liquidity to a pool you must first navigate to the “Pool” section where you will be presented with an option to create a “+New Position”. Click the button to get to the next step.

The next step is to select the token pair that you would like to add as liquidity. You will need two tokens, but unlike Uniswap V2 you do not necessarily need equal dollar amounts of each token to enter the pool. In V3, the amount of tokens will depend on where you set your ranges. You will be able to see the balances change as you slide the price range UI.
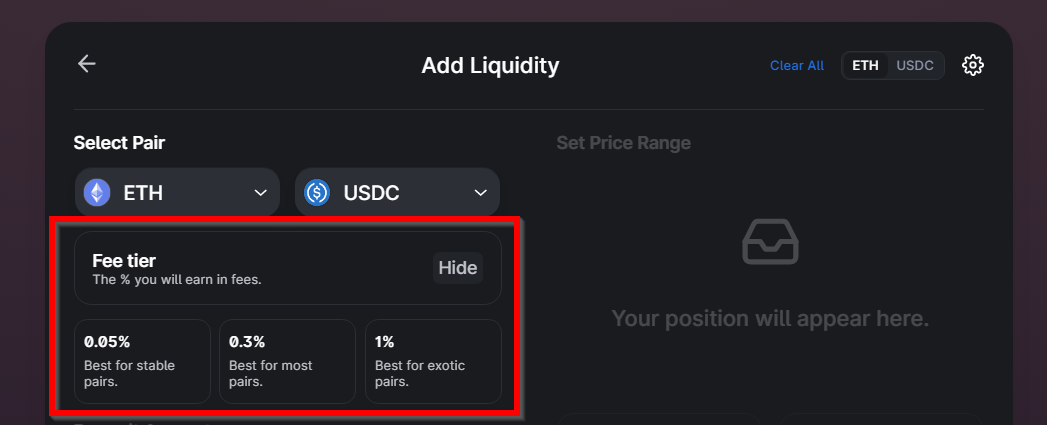
The next step is to select a fee tier. Uniswap will auto-suggest a tier based on which pool with that fee has the most liquidity. The fee tiers that were available at the launch of V3 were 1.00%, 0.3% and 0.05%. Recently the UNI token holders voted to add an additional tier of 0.01%. The highest tier (1%) is meant for volatile exotic assets that take on a lot of risk of impermanent loss. The lowest tiers are meant for pools with stablecoins that take on much less risk of impermanent loss.
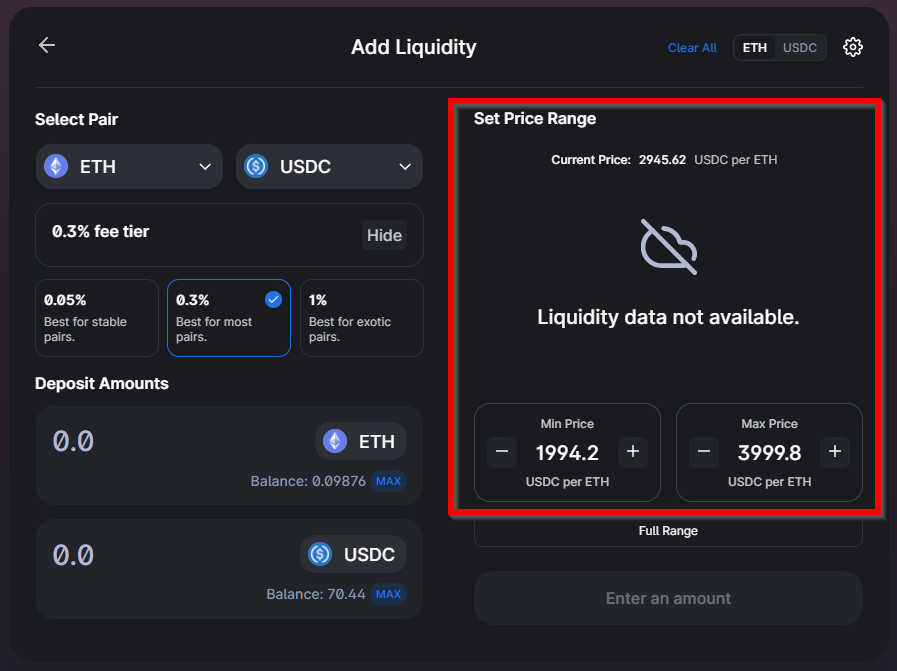
The next step is to set the price range on your position. Uniswap has predetermined “ticks”that dictate where you can set the ranges, and the interface will automatically snap to them when you move the slider. You can see in the example above in the CRV-USDC pool where a minimum price of $2.6976 is set and a maximum of $5.3245 is set. If the price of CRV drops below the minimum, the position will liquidate all of the USDC and sell it for CRV. If the price goes over the maximum range, the opposite will happen and all of the CRV will be liquidated for USDC. When the price has gone out of the range you have set, the position will stop collecting fees.
Given these features of V3 LP positions, it is important to think about how actively you want to be managing the position. Given the low transaction costs on Optimism, the cost of actively managing positions is significantly lower than the same process on Ethereum mainnet.
There is an option to select “full range” that functions more like Uniswap V2, but the amount of fees collected will be lower than a concentrated position closer to the trading price of the tokens.
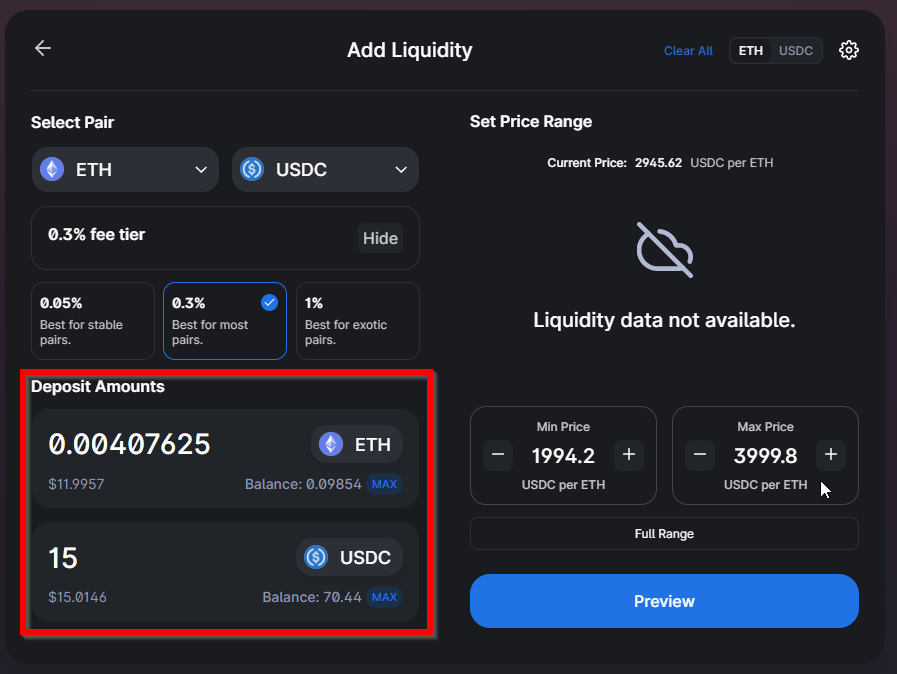
Once you have selected a price range you can then move on to the next step of deciding your deposit amounts. You can enter a value into one of the empty fields and the interface will autoOptimismally populate the other field with the amount of tokens required for that position. The ratio of these two fields is based on the position of your price range around the market price. You can adjust your ratio by sliding the price range along the chart or dragging the minimum or maximum price boundaries. The deposit amount that is typed in will remain the same, while the second asset amount will adjust to the new ratio based on your new price range.
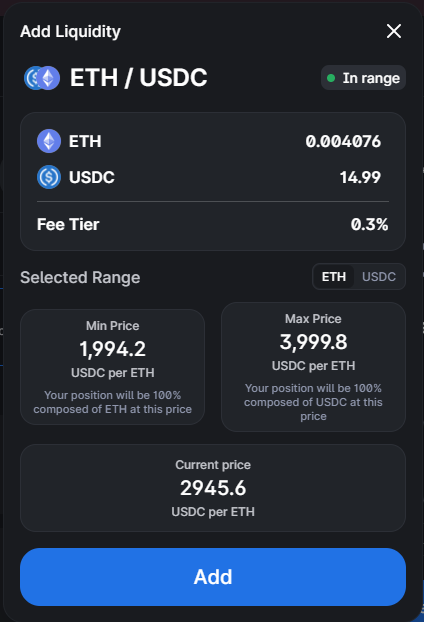
After adjusting all of the parameters for yoru Uniswap V3 pool position, you can hit the “Preview” button and a description of your position will appear. Once you hit “Add”, your Uniswap V3 NFT will be generated.

Once your position is generated you can see some basic information about it via the screen above. It will show the current value of the position, the current ratio of the tokens as well as the fees earned. What it will not show are factors like impermanent loss incurred, APR of the position, or performance over time.
Tracking Your Position on APY.vision
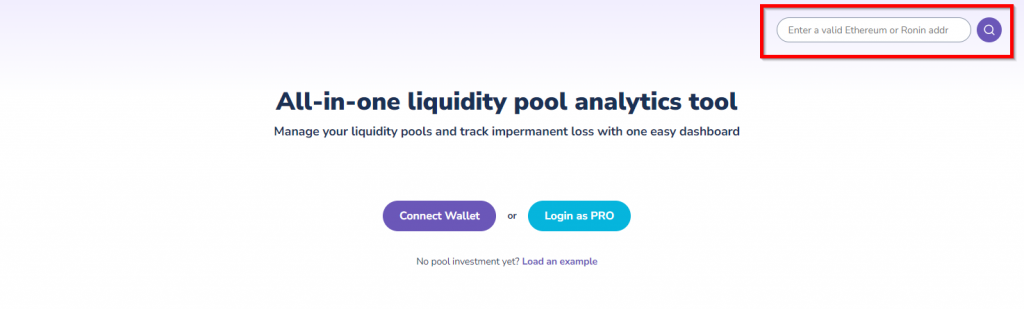
First time APY.vision users – enter your Optimism address in the box highlighted above. On mobile/tablets click on the search icon and copy their address into the popup
Uniswap V3 is a fantastic new innovation but is very complex and requires deep analytics to be aware of everything that is happening with your position. APY.vision has some features that can surface this information.

In the portfolio dashboard view as pictured above you will see a basic readout of your token balances in your V3 position. A handy feature is our “In range” or “Out of range” badge displayed for each of your positions. To get more extensive information, click the “View details” button.
Uniswap V3 Position Overview Dashboard
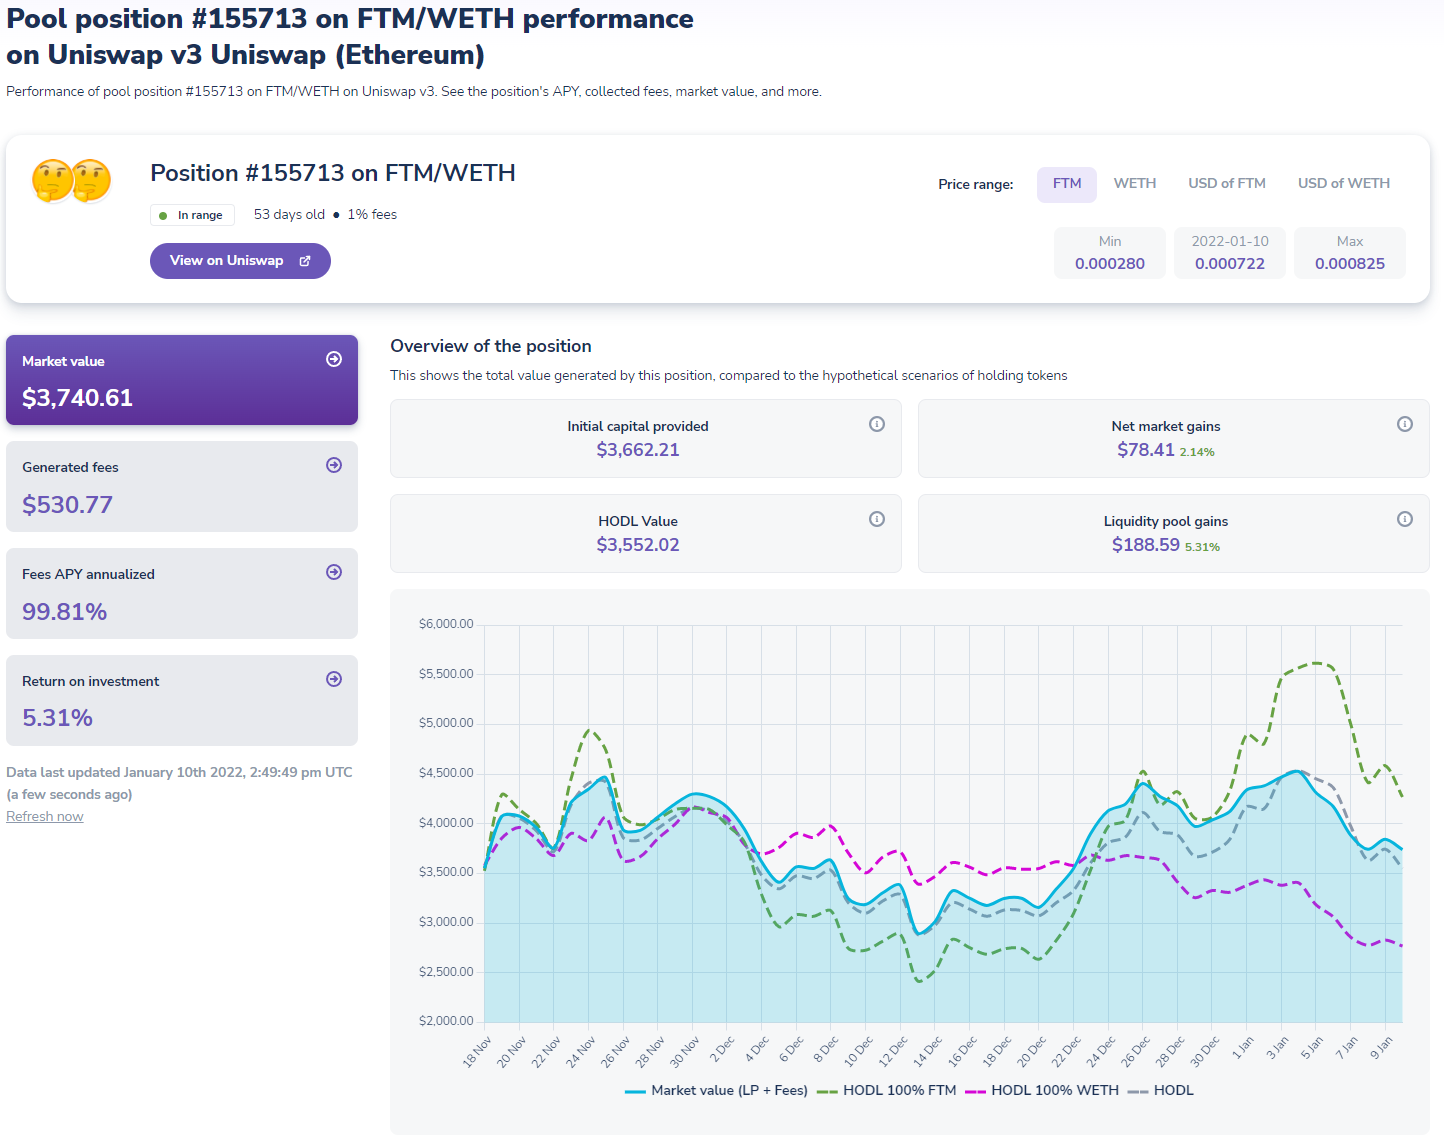
The details page will load on the “Market value” tab by default, giving a basic overview of the positions and some charts showing market performance in several different hypothetical situations. This chart is comparing the market value of your LP position with fees included against 3 other situations, holding both tokens in the amount you deposited them at, holding 100% of one of the tokens in the pair, or 100% of the other token in the pair.
Uniswap V3 Generated Fees display
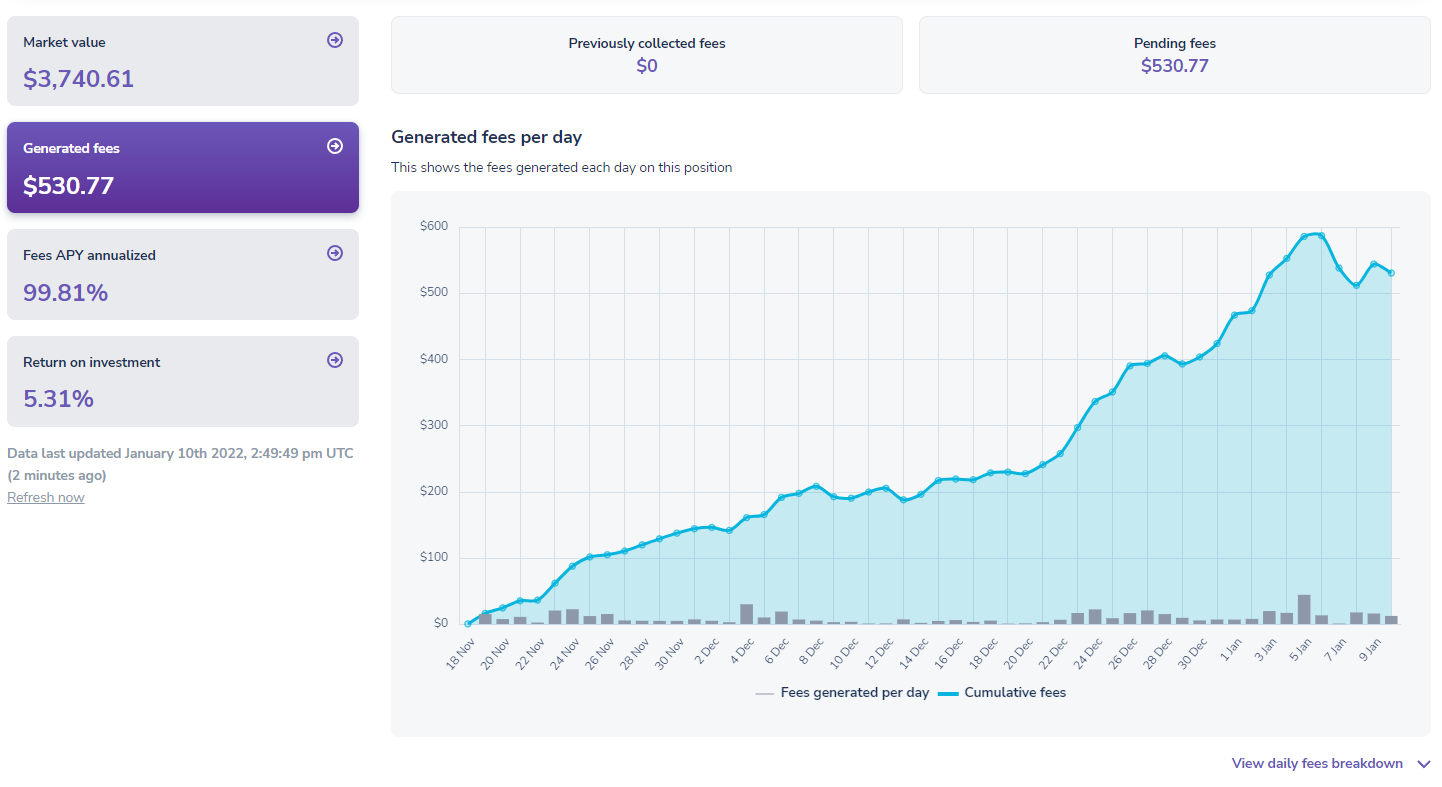
Clicking down to the next tab “Generated Fees” will show a chart with daily fee revenue, cumulative fee revenue and the total amount of pending fees.
Uniswap V3 “Fees APY” annualized display
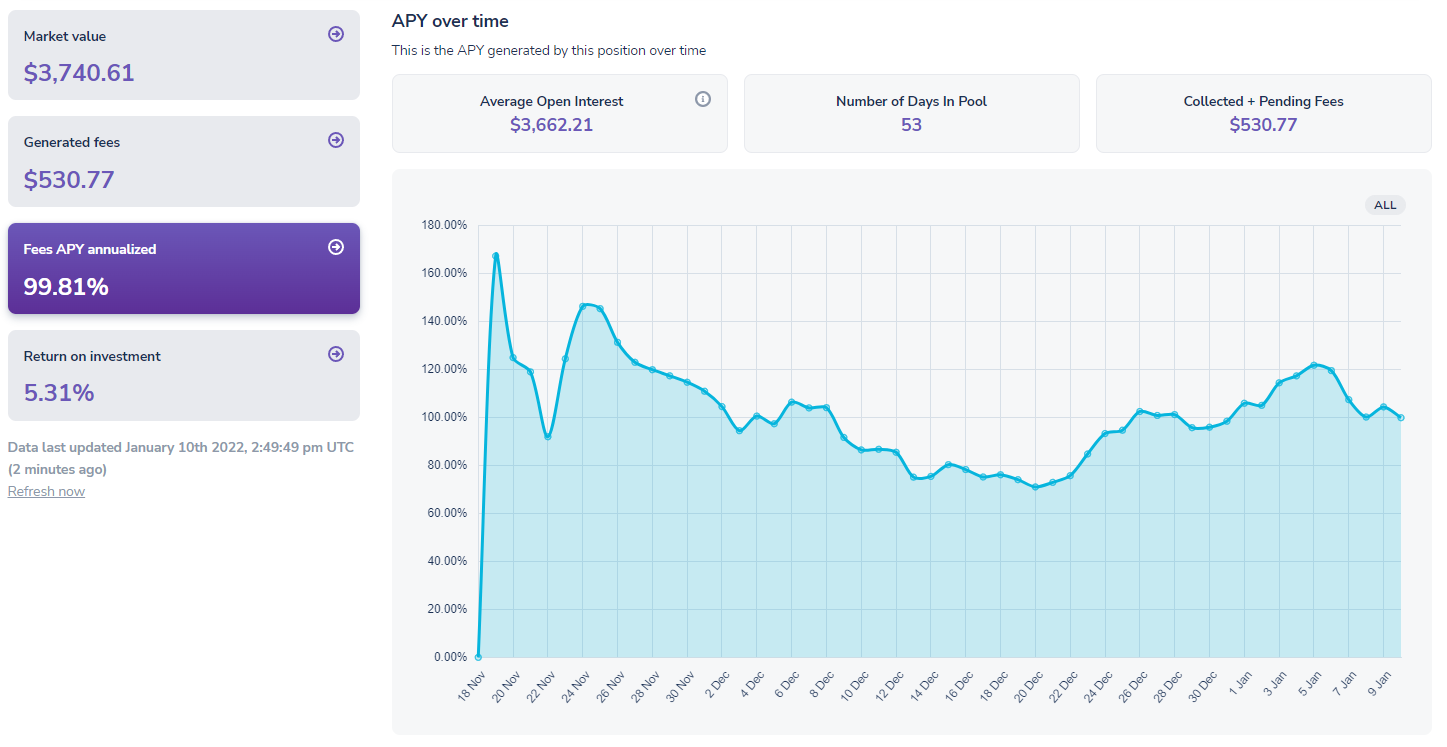
The next tab below titled “Fees APY annualized” displays a chart showing the performance of the position in APY terms to indicate hypothetical yearly performance since inception. Soon we will show prior day APY, prior 7-day APY, etc
Uniswap V3 “Return on Investment” display
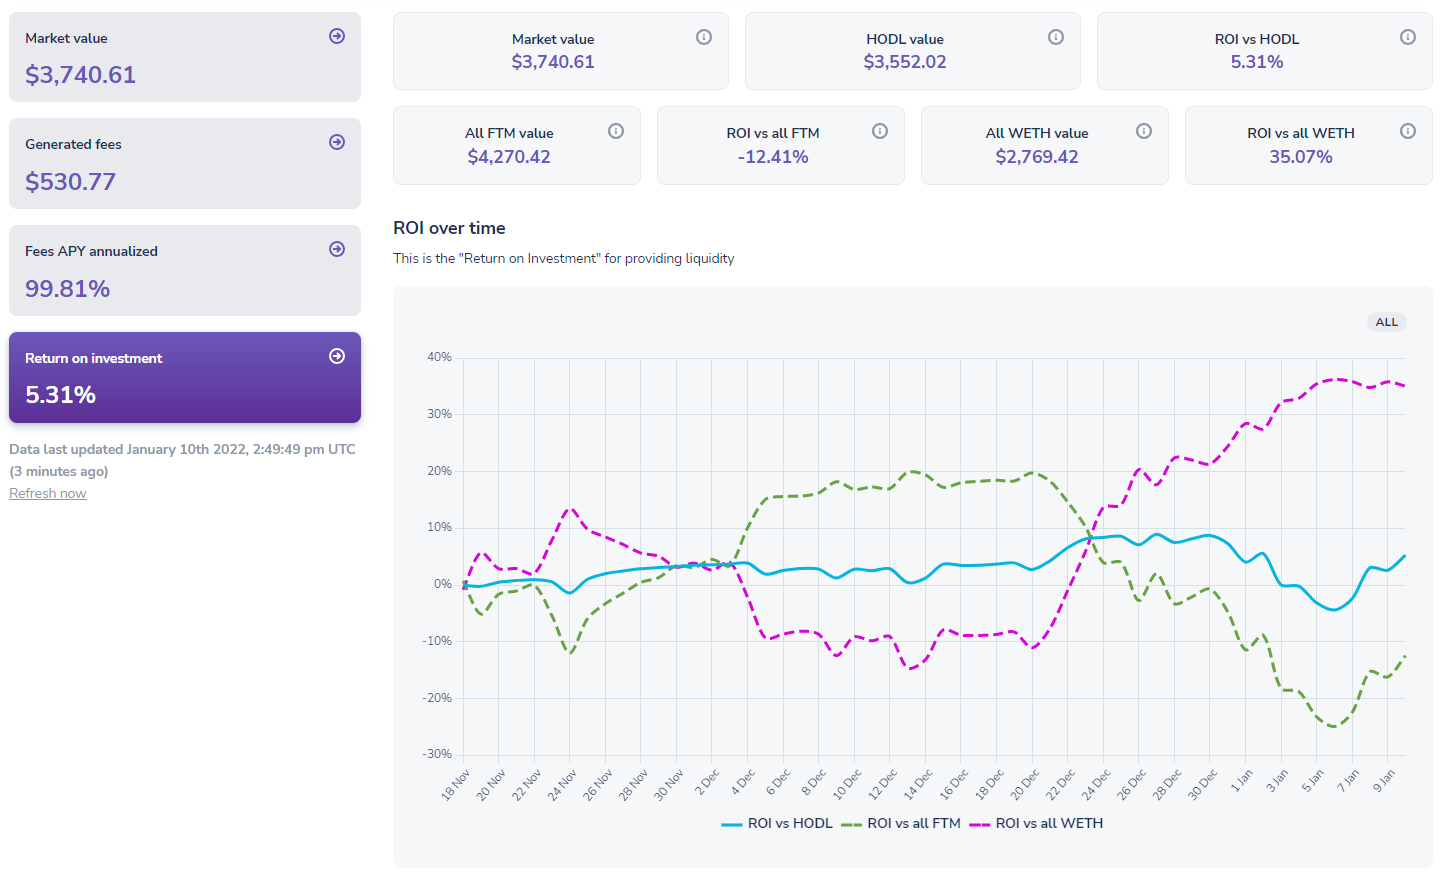
The final tab shows “return on investment” and gives several hypothetical situations to compare your performance with. It compares the market value with the value if you had held the same position and not provided liquidity to the pool and computes a figure labeled “ROI vs HODL” to show the relative increase or decrease in performance. Much like the first chart, it also compares the different situations like holding 100% of either of the tokens instead of entering the pool.
How to withdraw and what to expect
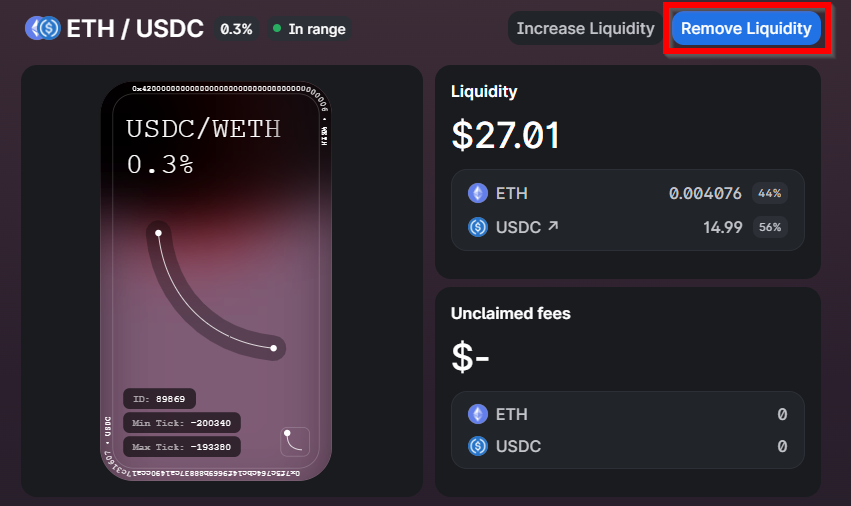
When you are ready to exit your position, navigate from the “Pool Overview” page into the individual pool position. You will be presented with a button to “Remove Liquidity” on the top right. Hit that button and you will get the prompt below.
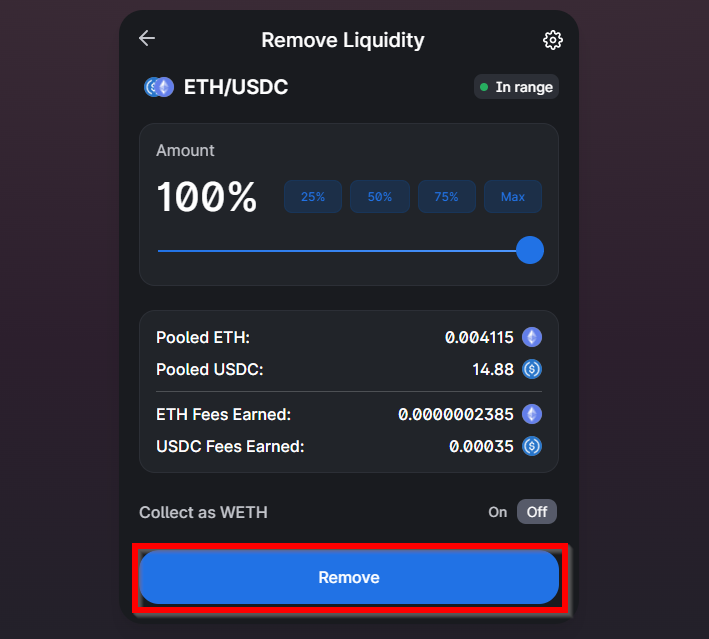
After hitting the remove liquidity button you will be shown the screen above where you can choose which portion of liquidity to remove as well as the token balances you will receive and the tokens earned from fees. Once you have removed your liquidity you will receive the total balance of all the tokens quoted in your wallet.
Conclusion
Providing liquidity is a great way to earn some income on tokens sitting in your wallet. You do have to be careful when providing liquidity, as sharp price increases or decreases can have a huge impact on the performance of your position. To read more about the risks, we highly recommend reading this post. We suggest using APY.Vision to keep a close eye on your positions to know when to remove liquidity during times of extreme price volatility.
Join our Community!
If you have any questions about the new features on APY.vision, feel free to come join our Discord community and share them! Our community is super helpful and we always like to hear input from our users. If you experience and bugs or notice problems with the website, you can create a ticket via our support system. If there are features you would like to see added to the website, you can make suggestions or vote on previous suggestions here!
APY.Vision does not give investment advice and always insists that you do your own research. Read our full Legal Disclaimer.
Check out APY.Vision!
APY.Vision is an advanced analytics tool for liquidity pool providers and yield farmers. If you’re using any DEXs, AMMs, or liquidity pools this is the tool you will need to easily track the ROI of your liquidity provider and yield farming activities. Try it now!